
Introduction
I have never worked on SEO before. I started from scratch, researching everything I could and implementing what was possible. The target audience is readers who use Next.js and want to start their own SEO efforts. No advanced technical skills are required, so even non-developers should be able to handle it.
Assumptions Regarding the Site Structure
This blog does not use WordPress or similar platforms. It uses Next.js with Static Exports and is hosted on Firebase Hosting. For managing blog articles, I decided to use microCMS. This is noted for those who are not familiar with it.
-
Basic SEO Concept
Next.js’s Static Exports generate an HTML file for each page at build time. This eliminates the need for server-side rendering and allows fast delivery using a CDN. -
Firebase Hosting:
A service that deploys to a global CDN (Content Delivery Network). -
microCMS:
A Japanese headless CMS that allows you to manage and deliver content through a simple API. Its well-documented and beginner-friendly nature is a key feature.
Firebase Hosting is used for fast delivery, while microCMS handles content management. I set up this structure because I plan to develop dynamic applications later on, so for now, this is the configuration I am using.
When you set output: 'export', it becomes a Static Export.
// next.config.ts
import type { NextConfig } from 'next';

const nextConfig: NextConfig = {
  output: 'export',
  ...
};

export default nextConfig;
Expressing SEO in My Own Words
SEO stands for Search Engine Optimization. In Japanese, it is translated as "検索エンジン最適化" (search engine optimization). In other words, it is the process of optimizing websites and content to be both “easy to understand” and “appealing” to search engines. As a result, it increases organic traffic without spending on advertising. By providing information that aligns with the search intent of users, user satisfaction and trust can be enhanced.
Search works as follows:
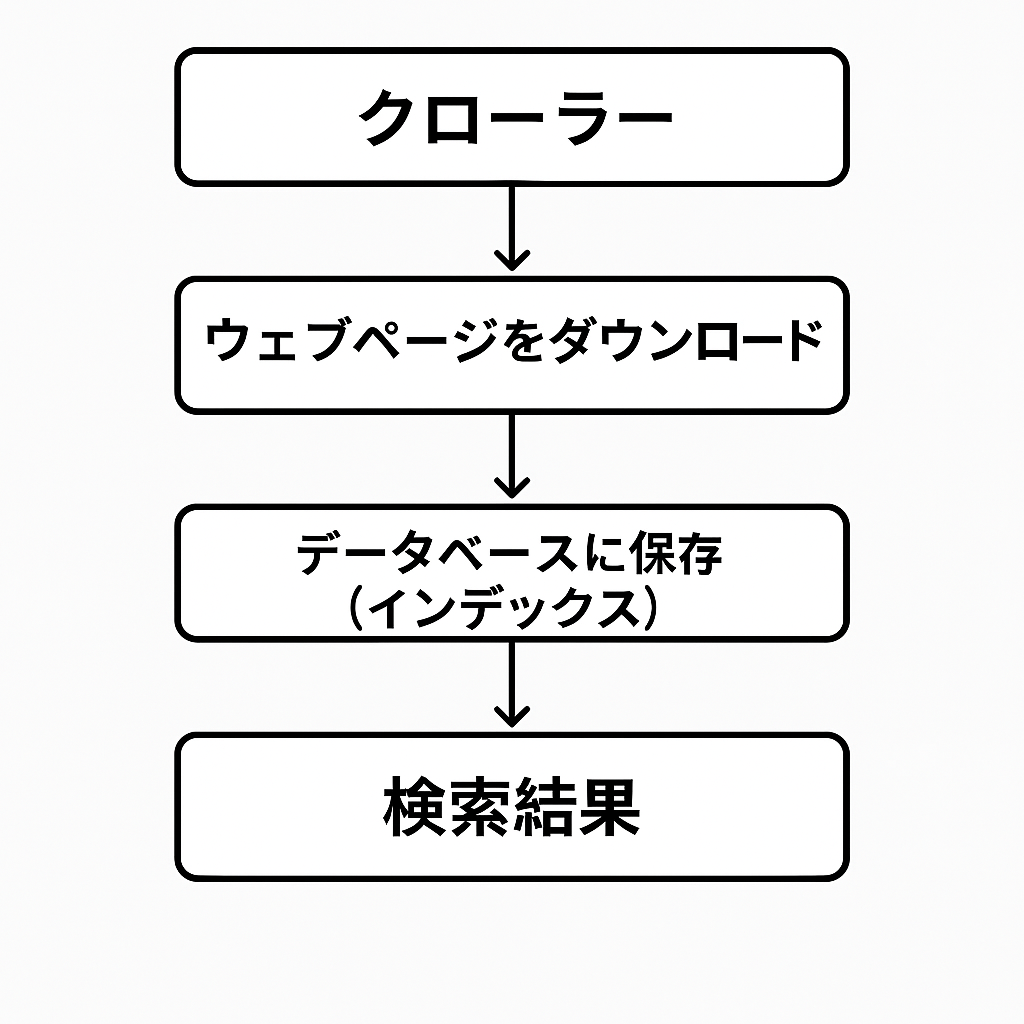
- A program called a crawler explores the web and downloads pages similarly to a browser.
- The discovered pages are analyzed and stored in a database, known as the index.
When a user performs a search, information related to the search query is returned. This likely uses the index—perhaps even in a vectorized format.
Topics to Address
I referred to the Overview of Topics on Crawling and Indexing and the Topics on How Search Appears. I decided to implement the following topics. If the results are insufficient, I plan to add more topics.
| No | Topic | Overview |
|---|---|---|
| 1 | robots.txt | Informs crawlers which pages they are allowed or disallowed to access. |
| 2 | Sitemap | Notifies Google about new or updated pages listed in the sitemap. |
| 3 | Page and Content Metadata | Conveys mainly display-related information about the page to crawlers. |
| 4 | Structured Data | Helps Google recognize the page’s content; it influences how search results are displayed. |
Creating robots.txt
As mentioned earlier, robots.txt tells crawlers which URLs on the site they are permitted to access. The format is explained in Google Search Central. Here are some key points I noted:
- The file must be named "robots.txt". Only one such file is allowed per site.
- It must be placed at the root of the site (e.g., https://mydomain.com/robots.txt).
- robots.txt consists of one or more sets of rules, which can be defined per user-agent.
- Crawlers process the file from top to bottom.
Rules in robots.txt
| Rule Parameter | Description |
|---|---|
| user-agent | Required. An asterisk (*) indicates all agents; however, AdsBot must be specified explicitly. AdsBot is a crawler that checks ad quality. |
| allow or disallow | At least one of allow or disallow is required. It must start with a "/" and is used to permit or block crawling. |
| sitemap | Optional. Zero or more per file. It is the fully qualified URL where the sitemap for the site is located. |
Implementation in Next.js
Refer to the Next.js Documentation . I also included AdsBot-Google for advertising purposes. Although the sitemap has not been created yet, it is commented out for future use.
// app/robots.ts

import type { MetadataRoute } from 'next';

export default function robots(): MetadataRoute.Robots {
  return {
    rules: [
      {
        userAgent: '*',
        allow: '/',
      },
      {
        userAgent: 'AdsBot-Google',
        allow: '/',
      },
    ],
    // sitemap: 'https://mokay.tech/sitemap.xml',
  };
}
Fixing a Build Failure in Next.js
The following error occurred:
Error: export const dynamic = "force-static"/export const revalidate not configured on route "/robots.txt" with "output: export".
Cause:
Static Exports do not support ISR (Incremental Static Regeneration). ISR is a mechanism that regenerates pages after the build to keep them updated, which is incompatible with Static Exports that output fully static HTML (as with robots.txt).
Solution:
Since robots.txt does not require frequent updates, ISR was disabled by treating it as fully static content with export const dynamic = 'force-static'. This resolved the build error.
// app/robots.ts

import type { MetadataRoute } from 'next';

export const dynamic = 'force-static';

export default function robots(): MetadataRoute.Robots {
  return {
    rules: [
      {
        userAgent: '*',
        allow: '/',
      },
      {
        userAgent: 'AdsBot-Google',
        allow: '/',
      },
    ],
    // sitemap: 'https://mokay.tech/sitemap.xml',
  };
}
Creating a Sitemap
A sitemap is a file that communicates information about the pages on a site to search engines. For small sites or those with comprehensive internal linking, it may not be necessary. However, since it is specified in robots.txt, I decided to create one.
Using next-sitemap for Simplicity
Next.js provides a built-in solution for sitemaps, as mentioned in this documentation. However, since it seemed straightforward, I followed the instructions in next-sitemap.
First, install next-sitemap:
npm install --save-dev next-sitemap
Add a configuration file. The generateRobotsTxt option creates robots.txt, but since one already exists, it is set to false.
// next-sitemap.config.js
module.exports = {
  siteUrl: 'https://mokay.tech',
  generateRobotsTxt: false,
};
Then, add a script entry:
// package.json

{
  ...
  "scripts": {
    "postbuild": "next-sitemap"
  },
  ...
}
Run the script:
npm run postbuild
This generates sitemap.xml and sitemap-0.xml. The sitemap.xml is an index file that splits the sitemap into smaller parts to keep each file within size limits.
I also updated robots.ts by uncommenting the sitemap line so that the sitemap will be crawled.
// app/robots.ts
import type { MetadataRoute } from 'next';

export const dynamic = 'force-static';

export default function robots(): MetadataRoute.Robots {
  return {
    rules: [
      {
        userAgent: '*',
        allow: '/',
      },
      {
        userAgent: 'AdsBot-Google',
        allow: '/',
      },
    ],
    sitemap: 'https://mokay.tech/sitemap.xml',
  };
}
Including Page and Content Metadata
Metadata is primarily included using meta tags, which reside in the <head>section of HTML. Open Graph Protocol (OGP) can also be added here to display supplementary information on social networks like X or Facebook.
In Next.js, metadata can be added using generateMetadata. I fetch blog data from the microCMS API and generate pages in page.tsx. The properties provided to generateMetadata must match the props and types used in page.tsx.
// src/app/blog/[id]/page.tsx

// Generating the blog article detail page
export default async function BlogArticle({ params }: { params: Promise<{ id: string }> }) {
  const { id } = await params; // Retrieve the ID
  const blog = await getBlog(id);

  const formattedDate = dayjs(blog.publishedAt).format('YY.MM.DD');

  return (
    <>
      <Header className={appStyle.backgroundHero} />
      <main className={`${appStyle.partsGrid} ${styles.blogArticle}`}>
        <section
          className={`${styles.blogArticleHeader} ${appStyle.grid12}`}
          style={{
            backgroundImage: `url(${blog.eyecatch.url})`,
            backgroundSize: 'cover',
            backgroundPosition: 'center bottom',
          }}
        >
          <h1>{blog.title}</h1> {/* Display the title */}
          <time>{formattedDate}</time> {/* Display the date */}
        </section>
        <ul className={styles.tag}>
          {blog.tags &&
            blog.tags.map((tag) => (
              <Link key={tag.id} href={`/blog?tag=${tag.name}`}>
                <TagButton key={tag.id} name={tag.name} />
              </Link>
            ))}
        </ul>
        <BlogArticleContent content={blog.content} />
      </main>
      <Footer />
    </>
  );
}

export async function generateStaticParams() {
  const blogIds = await getAllBlogIds('blog');

  return blogIds.map((contentId) => ({
    id: contentId, // Return each article's ID as a parameter
  }));
}

// Generate dynamic metadata using database values
export async function generateMetadata({ params }: { params: Promise<{ id: string }> }) {
  const { id } = await params;
  const blog = await getBlog(id);

  const plainText = blog.content.replace(/<[^>]*>/g, '');

  return {
    title: blog.title,
    description: plainText.slice(0, 150), // For example: extract the first 150 characters of content
    openGraph: {
      title: blog.title,
      description: plainText.slice(0, 150),
      url: `https://${process.env.NEXT_PUBLIC_MY_DOMAIN}/blog/${blog.id}`,
      images: [
        {
          url: blog.eyecatch.url,
          width: 1200,
          height: 630,
          alt: blog.title,
        },
      ],
    },
    twitter: {
      card: 'summary_large_image',
    },
    alternates: {
      canonical: `https://${process.env.NEXT_PUBLIC_MY_DOMAIN}/blog/${blog.id}`,
    },
  };
}
Including Structured Data
Structured data is also used to convey information to search engines—not for display, but to communicate meaning and attributes.
Google recommends using JSON-LD for structured data, so I implemented it using this format. There are general guidelines to follow, and technical checks (such as the Rich Results Test) can verify support for rich results.
Quality is maintained by avoiding any fraudulent practices.
Since Google does not provide detailed explanations for @context and @type, I looked them up and found that they are defined by the W3C.
As this is a blog post, I referred to the Article Object properties.
I added the property settings to the jsonLd variable, which is eventually output as a script tag.
// src/app/blog/[id]/page.tsx
// Generating the blog article detail page
export default async function BlogArticle({ params }: { params: Promise<{ id: string }> }) {
const { id } = await params; // Retrieve the ID
const blog = await getBlog(id);
const formattedDate = dayjs(blog.publishedAt).format('YY.MM.DD');
const jsonLd = {
'@context': 'https://schema.org',
'@type': 'BlogPosting',
author: [
{ '@type': 'Organization', name: 'MOKAY TECH', url: `${process.env.NEXT_PUBLIC_MY_DOMAIN}/` },
],
datePublished: blog.publishedAt,
dateModified: blog.revisedAt,
headline: blog.title,
image: [
`${blog.eyecatch.url}?ar=1:1&fit=crop`,
`${blog.eyecatch.url}?ar=4:3&fit=crop`,
`${blog.eyecatch.url}?ar=16:9&fit=crop`,
],
};
return (
<>
<script
type="application/ld+json"
dangerouslySetInnerHTML={{ __html: JSON.stringify(jsonLd) }}
/>
);
}
export async function generateStaticParams() {
const blogIds = await getAllBlogIds('blog');
return blogIds.map((contentId) => ({
id: contentId, // Return each article's ID as a parameter
}));
}
// Generate dynamic metadata using database values
export async function generateMetadata({ params }: { params: Promise<{ id: string }> }) {
const { id } = await params;
const blog = await getBlog(id);
const plainText = blog.content.replace(/<[^>]*>/g, '');
return {
title: blog.title,
description: plainText.slice(0, 150), // For example: extract the first 150 characters of content
openGraph: {
title: blog.title,
description: plainText.slice(0, 150),
url: `https://${process.env.NEXT_PUBLIC_MY_DOMAIN}/blog/${blog.id}`,
images: [
{
url: blog.eyecatch.url,
width: 1200,
height: 630,
alt: blog.title,
},
],
},
twitter: {
card: 'summary_large_image',
},
alternates: {
canonical: `https://${process.env.NEXT_PUBLIC_MY_DOMAIN}/blog/${blog.id}`,
},
};
}
Summary
In this article, I explained the basic implementation of SEO strategies using Next.js and microCMS.
Key Points:
-
Basic SEO Concept SEO stands for search engine optimization. It improves search result rankings by enhancing content and site structure, covering on-page, off-page, and technical SEO to align with user intent.
-
Static Site Generation with Next.js Using Next.js’s Static Exports enables fast and flexible site management. The combination of Firebase Hosting and microCMS also paves the way for future dynamic applications.
-
Implementation of robots.txt and Sitemap robots.txt is used to define crawler access rules, and the sitemap notifies Google about new or updated pages. Including AdsBot-Google also prepares the site for ad quality checks.
-
Utilizing Metadata and Structured Data By using meta tags, Open Graph, and JSON-LD, the site accurately conveys page content and structure to search engines, aiming for rich result displays.
These measures form the foundation for further improvements and performance evaluations. I encourage you to use this implementation as a reference and try your own SEO strategies.
References
For more detailed information, please refer to the following resources: